Log Graphs and Grokkability
Posted on Thu 12 December 2024 in misc
In his novel Stranger in a Strange Land, Robert Heinlein1 introduced the word grok. It is used all the time in the computing sphere, but rarely, as far as I know, outside it. The definition that seems to me most closely to match its usage is:
grok (transitive verb).
- To understand profoundly through intuition or empathy.
grok (verb).
-
To have or to have acquired an intuitive understanding of; to know (something) without having to think (such as knowing the number of objects in a collection without needing to count them: see subitize).
-
To fully and completely understand something in all its details and intricacies.
-
To get the meaning of something.
— The American Heritage Dictionary of the English Language, 5th edition.2
Graphs and other visualizations are among the most powerful tools we have for identifying and elucidating patterns in data—for helping us to grok data. A good graph can be extremely dense in information and easy to understand. By the same token, a bad graph can—deliberately or inadvently—be a powerful tool for misleading and spreading confusion and misunderstanding. Data professionals who subscribe to the Hippocratic Oath, “First, do no harm”, should avoid poor graphing practices as a matter of a high priority.
Log Scales
As I was writing a chapter on graphs in a book on TDDA, I happened upon the graph below from Our World in Data (OWID).
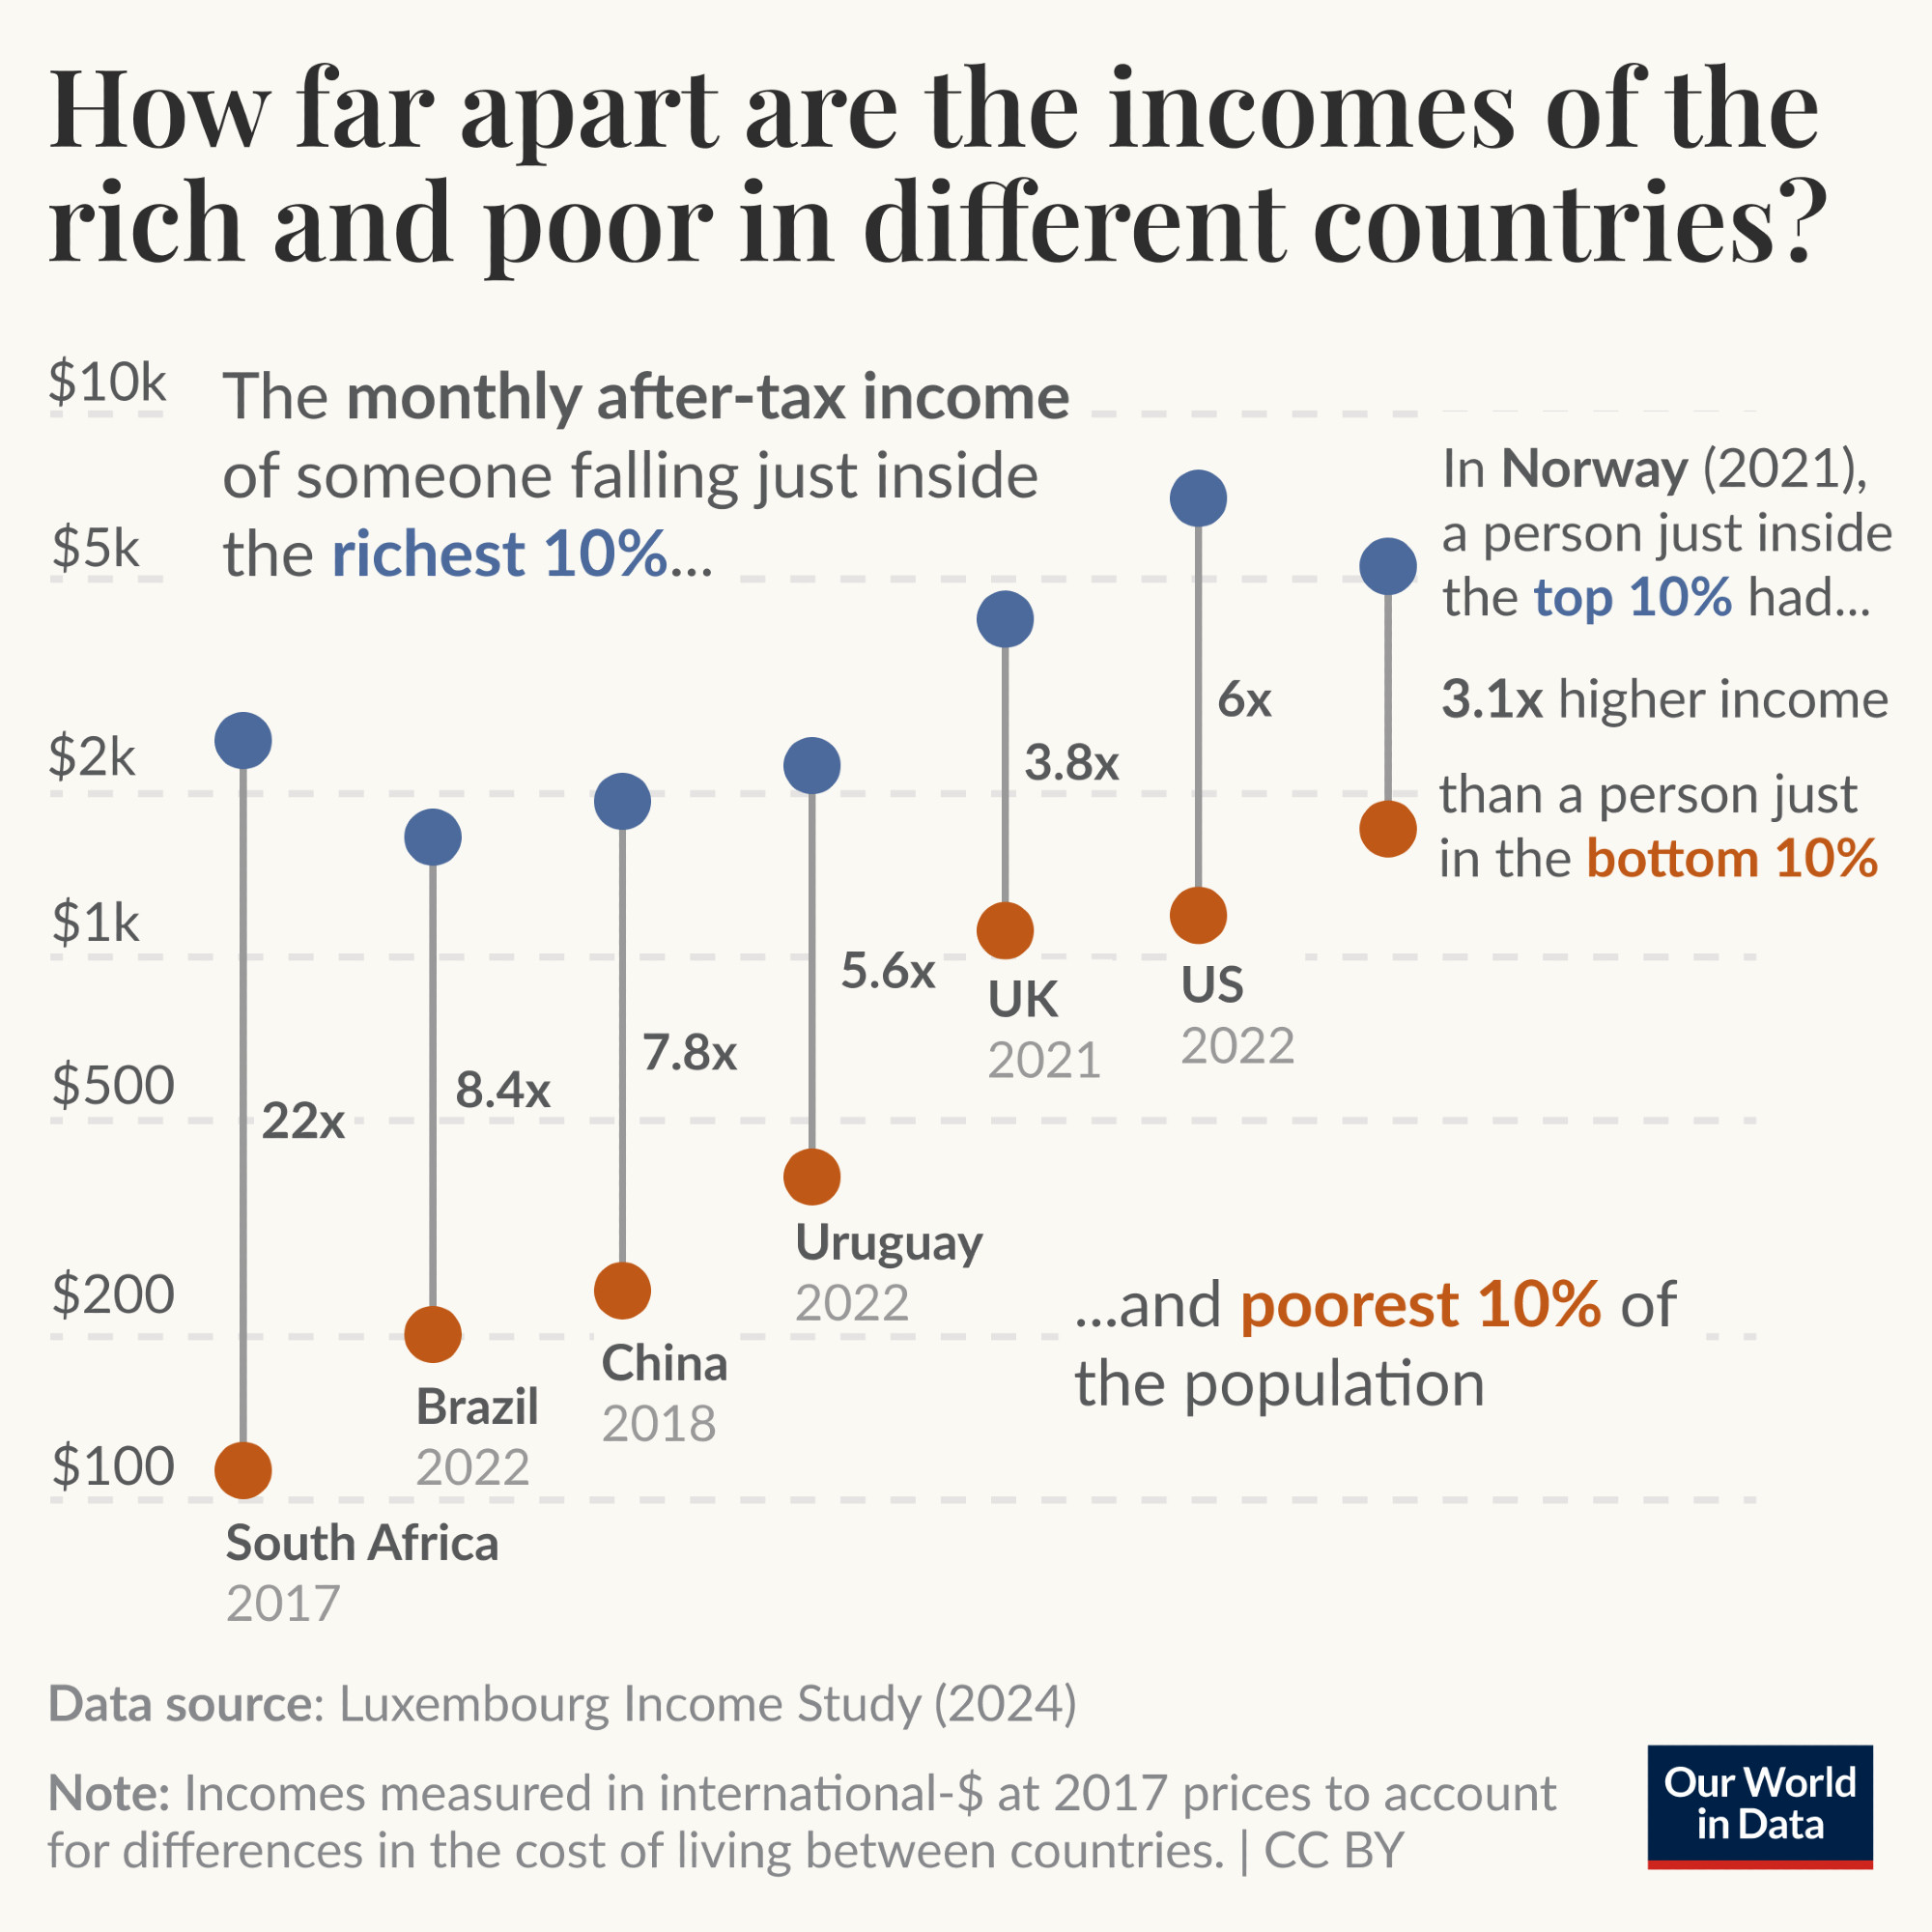
Graph from our world in data on Bluesky.
It uses data from the Luxembourg Income Study. and shows 14 base numbers—the post-tax incomes of the 10th percentile and 90th percentile citizens of seven countries (poorer and richer groups, respectively). The most common way of measuring income inequality uses the Gini coefficient,3 which is a single number that is powerful but rather abstract. The OWID graph is much more intuitive, focusing as it does on the ratio of incomes between a richer and poorer group, each defined by its position in the income distribution. The raw post-tax incomes and the derived multiples (ratios) are shown in this table:
The Data Shown in the OWID Graph.4
| Country | South Africa | Brazil | China | Uraguy | UK | US | Norway |
|---|---|---|---|---|---|---|---|
| Year | 2017 | 2022 | 2018 | 2022 | 2021 | 2022 | 2021 |
| 90th percentile ($USD) | 2,480 | 1,650 | 1,900 | 2,220 | 4,100 | 6,830 | 5,130 |
| 10th percentile ($USD) | 110 | 195 | 250 | 395 | 1,080 | 1,170 | 1,670 |
| Multiple | 22⨉ | 8.4⨉ | 7.8⨉ | 5.6⨉ | 3.8⨉ | 6⨉ | 3.1⨉ |
Before discussing weaknesses with the graph, consider a few of its exemplary features. The graph minimizes chart junk5 while clearly explaining the findings with various direct annotations. Labels are close to the data, the numbers are easy to read, and different weights and colours (shades) of text are used to emphasize and de-emphasize information. The seven numbers they most wish to focus on are the income ratios for each country, which are shown clearly. The notes at the bottom both specify the source of the data and provide useful guidance about interpreting the numbers. The use of colour is effective, and the colours used appear to have been chosen to work for readers with colour blindness as well as everyone else. I think the graph draws the reader in, and is much more likely to cause someone to stop and study it than the dry table of numbers alone would be, particularly in social media (where I saw this).
Despite these many merits, I think the graph only partially succeeds as a graph. My own experience was that I did get a feel for the information (I believe) the graph was trying to communicate by reading it (which did not take too long—it is, after all, only 21 numbers), but to gain that understanding I did have to read all 21 numbers—the 7 multipliers from the labels, and the 14 incomes by looking across at the y-axis. Even when I had done this, I still did not have the same intuitive, almost visceral understanding that comes from a really effective graph. The immediate reason for this is the log scale: humans simply do not have the same effortless ability to grok information presented using log-scaled lengths as we do with proportionately scaled lengths.
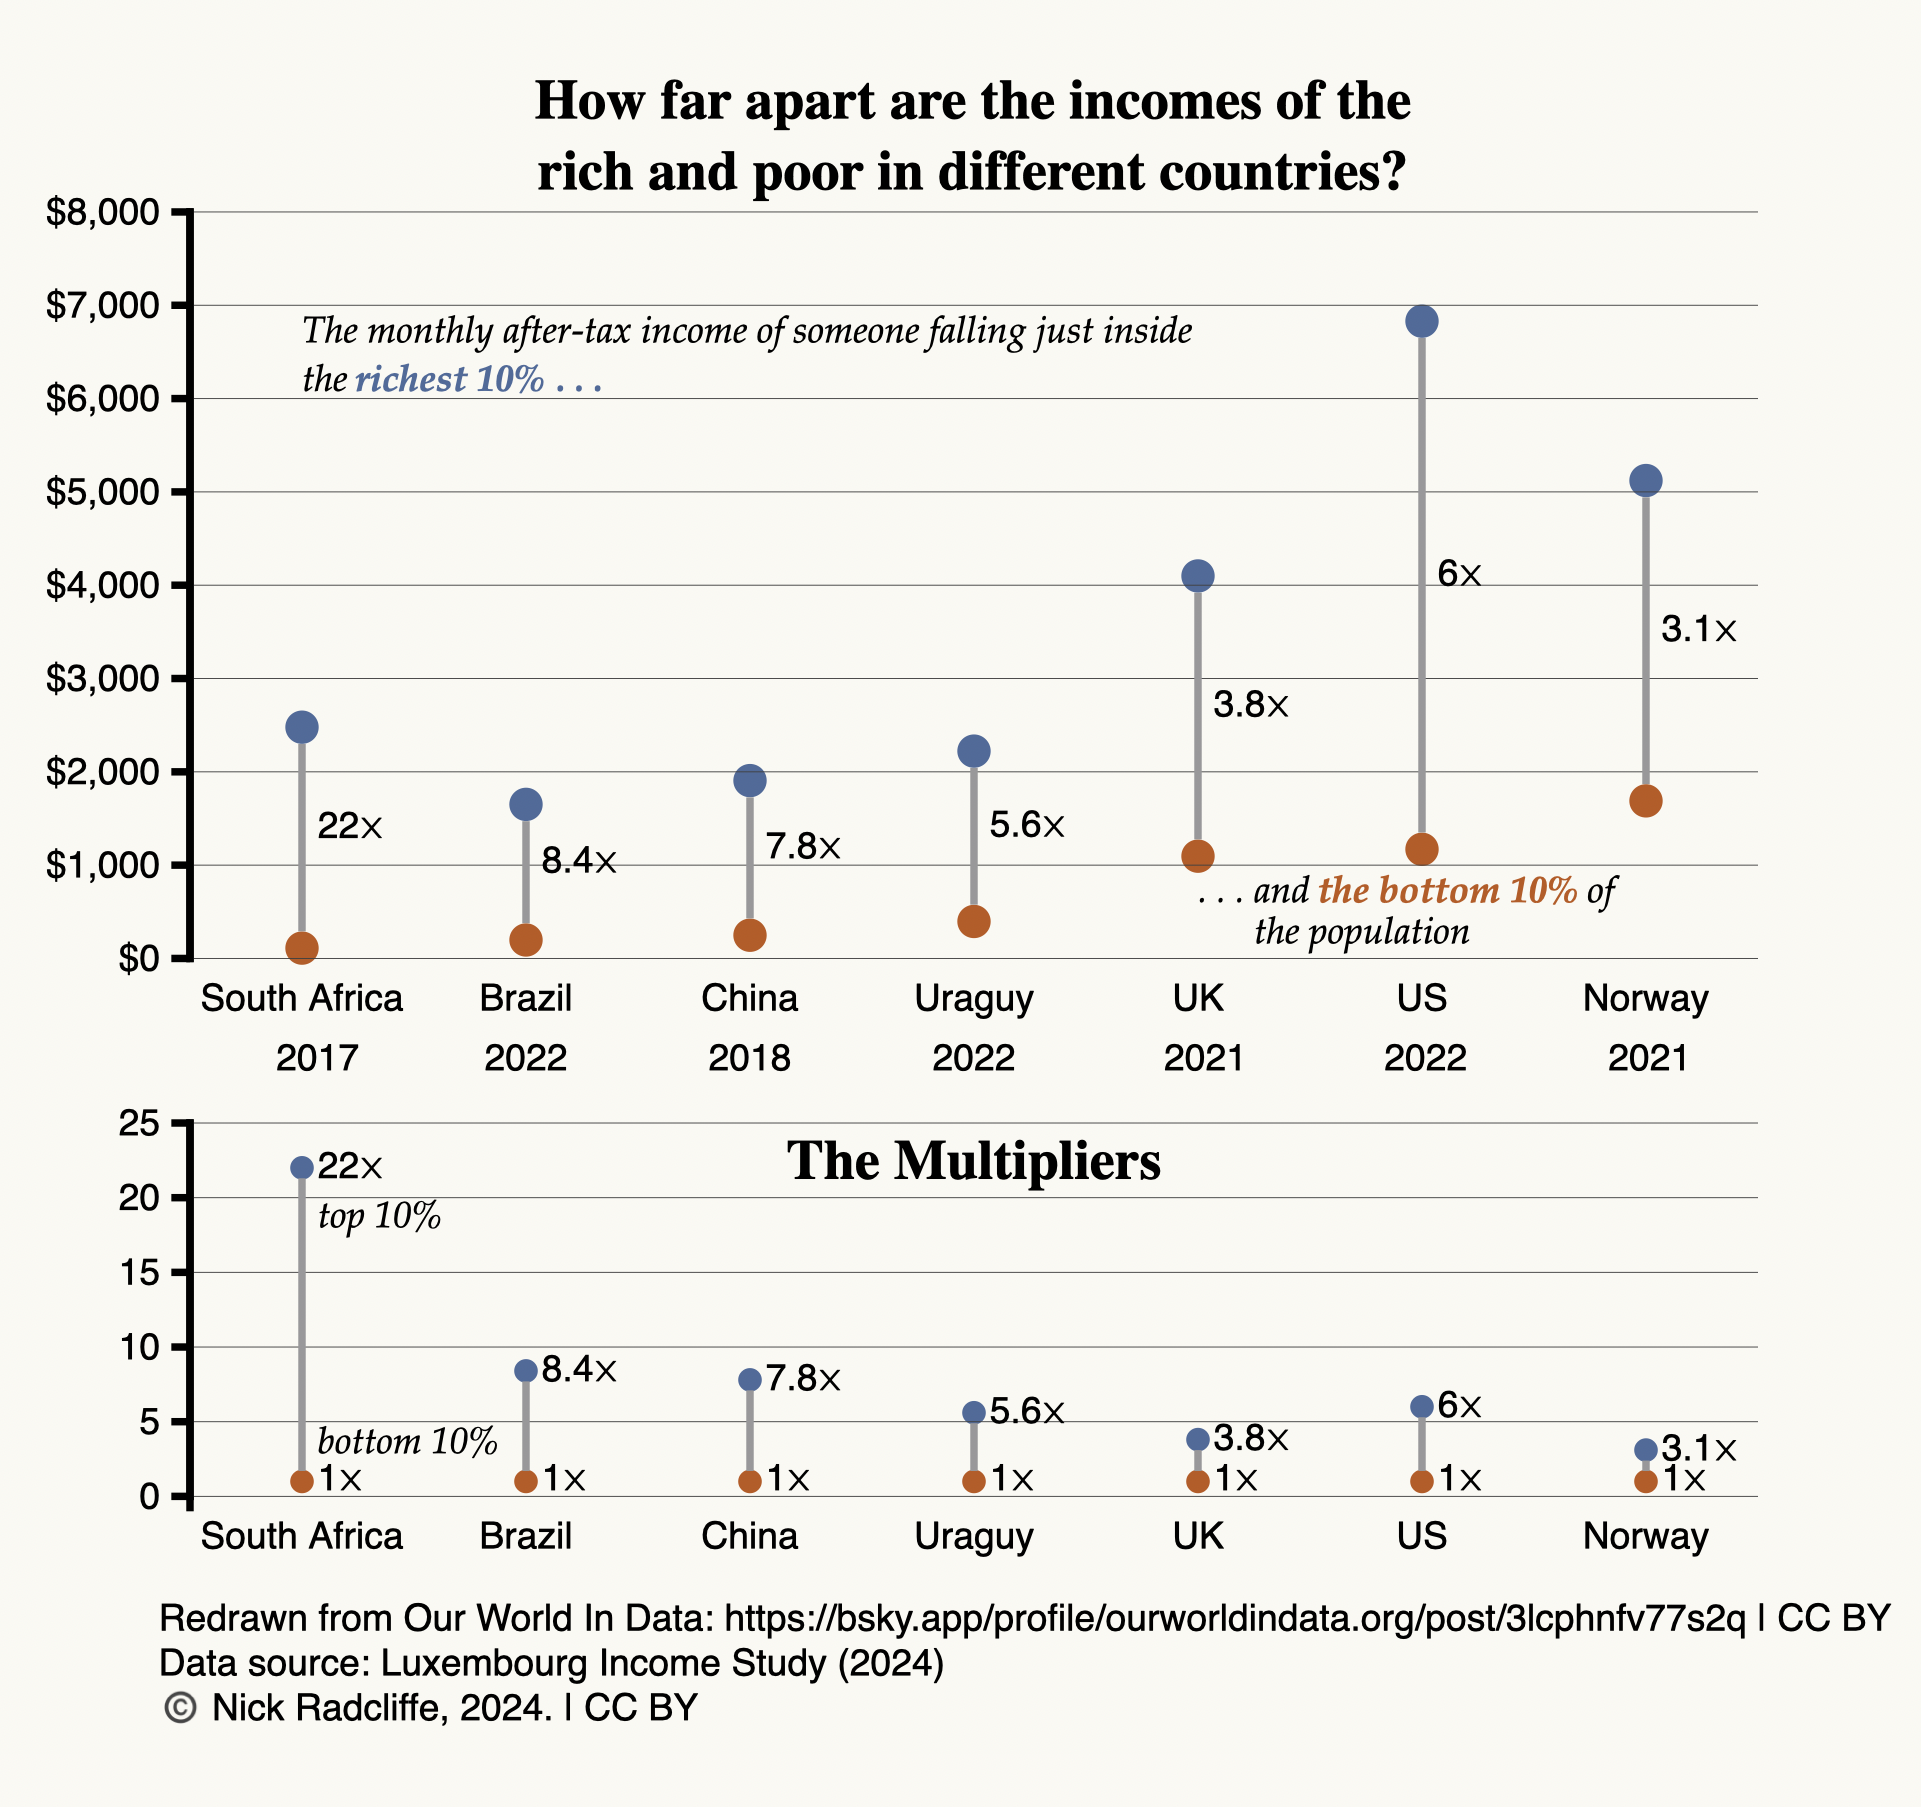
My first instinct was the that log scale was unnecessary: the range of values is not too great to show comfortably on a linear scale. So I plotted the top graph of the pair above, which comfortably displays all the incomes, albeit with the qualification that differences in the incomes of the poorer groups in first four countries are harder to differentiate. (Smaller markers would help here, but I wanted to change as little as possible from the OWID graph, where the marker size is not a problem.) I contend that the redrawn graph makes it easier to compare incomes across the seven different countries visually. Unfortunately, however, it is hopeless for conveying the income ratios, which are surely the quantities OWID most wanted to communicate. In the redrawn graph, a larger separation between the rich and poor groups does not mean that the income ratio is larger, still less is the separation proportional to the ratio: the absolute difference between incomes in the US is more that twice that in South Africa, because incomes are so much higher in the US, so its multiplier of 6⨉ is represented by a much longer line than is the 22⨉ multiplier for South Africa. The log plot cleverly resolves this because addition of logs is equivalent to multiplication of the original quantities. As a result, differences on a log plot are the logs of the ratios, and do rank the ratios correctly.6
The cleverness of the presentation chosen by OWID is that it allows a single graph, with a single scale, to show both the relative incomes among countries and the ratios between incomes of the the richer and poorer groups in each country. But the cost of this approach is that not only the income scale itself, but also the multipliers are shown on log scales which—to labour the point—are hard to grok.
The bottom graph in the redrawn figure shows the multipliers themselves on a linear scale. I think this is a significantly better (more grokkable) way to visualize them. There is, however, a final subtlety. In general, ratios of positive quantities can have any positive value. But in this case, the multiplier constructed is the ratio of a larger income (the 90th percentile) and a smaller one (the 10th percentile). Manifestly, this cannot be smaller than 1—the value it would take if everyone in the country had the same post-tax income. It is for this reason that I have drawn the connecting lines on the last plot from 1⨉ to the multiplier, rather than from 0, and have chosen not to present this as a conventional bar graph. One is the effective zero for these particular multipliers.7 A country with a perfectly even income distribution would have no distance between the 10th and 90th percentiles—once more emphasizing how clever the device of using a log scale for this data is, even if, as I contend, it was ultimately a poor choice for communcation.
Another way of saying this is that OWID (I believe) was trying to show two different things, lying on naturally different scales, on a single plot. OWID found a clever technical solution that allowed them to do this, but at the cost of grokkability. As I deconstructed it, I realised I needed two plots to show the data in ways that I think are much easier to understand. You, of course, must form you own judgement.
-
Heinlein, Robert A. (1961). Stranger in a Strange Land. G. P. Putnam’s Sons. ↩
-
The American Heritage Dictionary of the English Language (2022). 5th ed. Random House Inc. ↩
-
Hasell, Joe (2023). Measuring inequality: what is the Gini coefficient? In: Our World in Data. https://ourworldindata.org/what-is-the-gini-coefficient. ↩
-
The data was reconstructed from the OWID graph, so there will be minor deviations from the original Luxembough Income Study data. ↩
-
The Visual Display of Quantitative Information, Edward R. Tufte, Graphics Press, 1984. ↩
-
since logarithms are monotonic, increasing functions. ↩
-
because log 1 = 0 ↩


